Making (or made) your own cabinets? Me too - 3-month progress update
This is a slow week between holidays and semesters, so I thought I'd share some photos of my kitchen-in-progress.
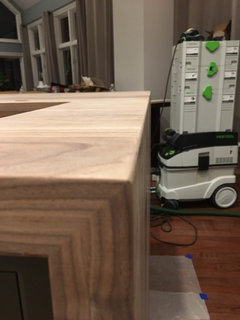
I'm making my own cabinets out of vertical grain Doug-fir. They will have inset doors/drawers, with nearly all base cabinets as drawers, with Blum hardware, soft-close/self-close, etc., and a clear lacquer finish.
A few months I asked for layout advice here. Thanks to all who offered layout suggestions. Since then, I've made all the base cabinet boxes and am about to start the doors/drawers. Then in the spring I'll move on to uppers.
Here's the plan:

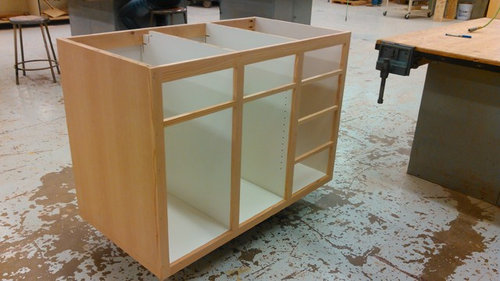
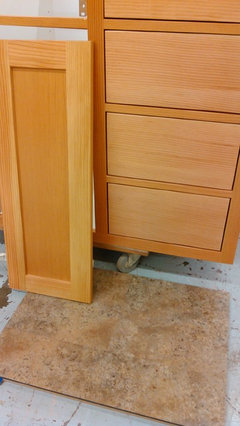
Here is my left bank of base cabinets, which will be a drawer/trash pullout, then a prep/bar sink with a recycling pullout, and finally drawers for knives, graters, measuring stuff, and other prep items (see the vision?):
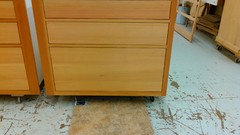
This is my cookbook cabinet. It's also a base cabinet that will go on the opposite (right) end of the U, with the finished panel facing into the middle of the room:

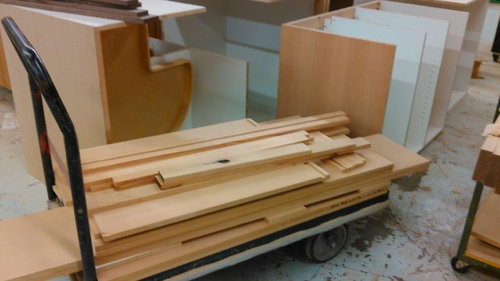
And here is the cart I push around two evenings per week, with base cabinets in various stages of construction in the background (including 1 of 2 corner super susans):
Although I have a small woodshop at home, the local technical college
offers an evening open-lab class and LOTS of space. Since I took the
class several years ago, the instructor has been kind enough to let me
re-take the open-lab multiple times (and I'm sure I'll take it a few
more times before I'm finished).
I've seen a few comments on various threads from others who are making or have made their own cabinets, so please feel free to share photos of your work-in-progress. You all inspire me!
Commentaires (29)

practigal
il y a 7 ansLooks good so far. Simply wonderful that you can do that and have a place for your work in progress!

mama goose_gw zn6OH
il y a 7 ansDernière modification :il y a 7 ansVery nice! I built a couple of upper cabinet boxes, one deeper than standard, and one shallower than standard, to fit specific spots in the kitchen, then built a door for a base cabinet filler--nothing on the scale you are doing. It's great that you have access to the large workshop, and great to see another woman who uses power tools ;). Please keep us updated.
mushcreek
il y a 7 ansBeautiful work! I built all of our cabinets, too. I had several unique design ideas, plus we built on a shoestring, so purchasing cabinets was not an option. I did all of my milling in the basement, but wisely decided to assemble the boxes upstairs. Good thing- they would have been too heavy to move otherwise! We hadn't done our finished floors yet, so the dining room served as a workshop.
Mine aren't as pretty as yours, especially before being painted, but I'm happy with the results.

DLM2000-GW
il y a 7 ansThey look wonderful so far - wood skills always impress me. I have a new appreciation for fir since we have 8" fir posts for our porches in our house build. How will you be finishing your cabinets? Can't wait to see this unfold.

salex
Auteur d'origineil y a 7 ansDLM2000, I'll be spray lacquering them in the dedicated spray room at
the tech college. In my own woodshop I usually use a wipe-on
custom-tinted stain followed by a wipe-on poly, but for these I wanted a
clear, durable finish - so lacquer it is.
Mushcreek, I
remember your kitchen reveal - your kitchen is gorgeous and inspiring! I
love the fact that you did it yourself and added so many personal
touches. When I read that you had built your entire house over 3-1/2
years, I decided to give myself some more patience with this kitchen
project. Very impressive.
CEFreeman_GW DC/MD Burbs 7b/8a
il y a 7 ansAnd I've made many of mine.
Mine are almost all in place but still working on doors and drawer fronts. When I save the $$, I augment my build with beaded inset from The Cabinet Joint.com. All in all, I have a mish-mash from making, buying a few, reuse center cabinets I've stripped, and crazy doors I've made out of pallets, packing crates, and boards found in the mud on a friend's farm.Just like me: mish-mash!
But never boring.
BTW. Gorgeous work you're doing.

cpartist
il y a 7 ansI am always so impressed with those who can do such fine work with wood. I've tried it in the past and just don't have the patience for it. These are going to be gorgeous and I eagerly await your next installment.
salex
Auteur d'origineil y a 6 ansOne-year update:
Demo started last Friday, and the base cabinets are nearly finished! Wood is vertical grain Douglas-fir; doors and drawers are inset. I am making my cabinets because nobody around here does this style or this wood species - or if they would, it would be ridiculously expensive.
Here are my two big drawer banks that will flank the range. This pull seems to look ok on the top drawer:

But not so much on the lower drawer (so I just ordered one 2" longer than shown). I can't help but look at this picture and think "Do these pulls make my drawers look big?"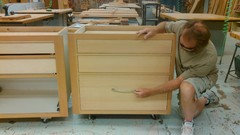
My trash, prep sink, and prep drawer cabinet, prior to spraying. I used spacers to fit the inset drawer fronts and doors:
The spray room. (Note that this is likely a big part of what you pay for with custom cabinets - ideally it should be a dedicated, dust-free room with supercharged ventilation.) Dovetail drawers are masked and ready for lacquer: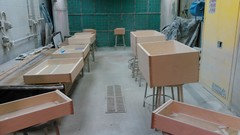
Drawers, doors, and DW panel fresh from the spray room: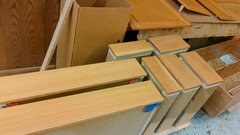
The prep drawers, with flooring sample (seems to go well with the D-fir cabinets, D-fir floor in adjacent dining room, and our black countertops). The Doug-fir darkened a lot in the first couple of days after spraying (which I like):
The big drawers, with flooring sample:
Next up: windows are already reframed and getting installed today. In two weeks I'll double-check measurements for upper cabinets and then start the next phase.More to come!
beachem
il y a 6 ansOh my it looks so beautiful and professional. I built my cabinets too but only one from scratch. The rest were IKEA and RTA. Mine definitely is not that professional when you look carefully at the details. Not the companies' fault but my lack of knowledge and experience.

hoovb zone 9 sunset 23
il y a 6 ansDid you use plans? You are doing a great job.
My neighbor built his out of solid walnut--50 years ago. They are gorgeous.
salex a remercié hoovb zone 9 sunset 23
Pamela Oryshchyn
il y a 6 ansWow! Looks fantastic. We did a lot of retrofitting to get our new-to-us cabinets to fit our space but didn't have to start any of them from scratch. These look very professional. :)
salex a remercié Pamela Oryshchyn
barncatz
il y a 6 ansI'd be impressed if they were a bit homemade/funky here and there; but these are amazing!
salex a remercié barncatz
House Vixen
il y a 6 ansHi Salex --
These are just gorgeous! (!!)
I love love VG fir and you've certainly done it justice here.
Ai yi yi is right re the cost for inset DF. I used to have a neighbor with custom DF...the next owner painted them white when cabs were still new-ish and yes, I did scream into my pillow haha.
If you decide you're sick of them after spending so much time together you know where to find me. Good luck as you approach the finish line!
salex a remercié House Vixen- salex a remercié michoumonster
salex
Auteur d'origineil y a 6 ansThank you all for the kind words! I am continually grateful for the great advice and encouragement that the community here shares so willingly.
@hoovb, I did not use plans but created my own plans. I took a cabinetmaking class about 6 years ago, where I learned the basics of furniture and cabinet construction (as well as what tools to use, and how to use them safely - as DH says, "10 in, 10 out!"). So for all of my projects, I begin by creating a drawing of what I want the piece to look like, with dimensions, and then create the plan to meet those specs. I do it on paper and then execute it with the dimensions laid out on a long, narrow 1"x1" stick (called a story pole or layout stick), where each of 3 sides of the stick is a different dimension (side-to-side, top-to-bottom, front-to-back). My kitchen layout stick is 14' long!
@House Vixen I screamed on the inside when I read about your neighbor painting VG fir cabinets! I'm glad to hear someone else shares my love of VG fir - it's such a classic look and fits the vintage of our house perfectly. Plus when I cut it, the smell reminds me of hiking in western mountains.
Beth
il y a 6 ansThose are absolutely beautiful! I've done enough woodworking to know how much more work inset is than frame or frameless--and you've done an amazing job.
I am really looking forward to your kitchen reveal!
salex a remercié Bethsalex
Auteur d'origineil y a 4 ansDernière modification :il y a 4 ansOh dear, has it really been almost 3 years?!? Here's the 2019 Spring update:
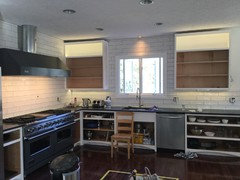
In September 2017, I finished my base cabinets. That same month, my contractors (GC and electrical) did the demo; reconfigured the windows; leveled the floor; installed plumbing and electrical; drywalled and painted; installed the finished base cabinets, countertops, sinks, appliances, and lights. So we had a temporary outdoor kitchen for about 6 weeks during demo/construction (AND my PhD comps - which I passed!). Ever since, we've had a functioning kitchen while I built the upper cabinets. Each time I finished an upper, I installed it (and of course filled it with stuff).
On an almost daily basis, I'm grateful for the advice I've read here (most via lurking, but also when I asked for layout help). My kitchen layout is super functional for us - we don't feel crowded, even when there are multiple people working in the kitchen at once.
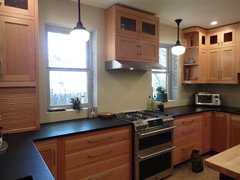
Here are some photos, from east to south to west along the U:
East wall:
ETA - I tore my ACL (skiing) while the corner cabinet shown below in the southeast corner was half-finished. That slowed things down - a lot (that, and the PhD that's still in progress).
South wall: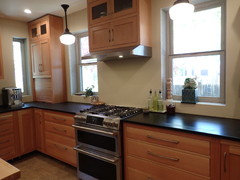
West wall: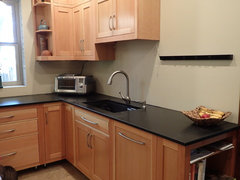
Note the lonely plugmold above, at end of the cabinet run. Here's the cabinet that will be finished and installed there next week:
Next steps are to mill, spray lacquer, and install a simple crown molding (like Badgergal's) and toekick. Then I need to finish the design of my pantry cabinets (on the opposite side of the kitchen from the U, which is where the fridge and micro are).And, most fun of all, once this last upper cabinet is installed, I'll order my backsplash!!!
Thanks again to all who helped me get this far. It's been a process, but I'm enjoying both the process and the end result.
skmom
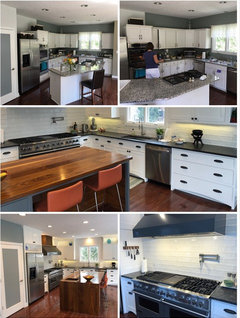
il y a 4 ansI forgot... I do have a few in progress photos. The one where one of our sons and I are standing next to the island was immediately after hubby had just made the waterfall cut and we were propping it up so he could see how it fit. LOL! That was such a nerve wracking day! LOL! We had paid all this extra money for walnut boards that were long enough to pull this off, and we couldn’t afford to mess it up. Hahahaha!
The entire kitchen project took about a year total. Hubby worked entirely from our garage and driveway. He also took off an entire summer because he finished up two masters degrees, walked for them, went on a short term missions trip to Ghana, and one of our sons competes a lot for his sport (springboard/platform diving) and there’s a lot of travel for it, especially in summer as that’s the main competition season for him. But I was only entirely out of a functioning kitchen for two weeks (well, I used my laundry room and the grill out back during those two weeks) but I lived for quite a while without doors or drawers on my cabinetry... but my kitchen functioned during that time, which was important to me as we have five busy kids. The kitchen was an entire gut job though, we took down a part of a wall, moved a gas line, moved electrical, moved some plumbing just a little bit, added ventilation that didn’t even exist prior... it was a big job. The only thing hubby hired out was the fabrication and installation of our granite countertops. (Oh, and we paid for the 60” range to be installed because there’s no way to get into our house without navigating a staircase, and we didn’t want to wrestle that beast. We got a GREAT deal on that range though, it was a floor model and we got over half off on it and the hood... we couldn’t pass it up, and our neighborhood can support this kind of kitchen.) Actually, the cabinet around our fridge, hubby made that so the shelf comes out easily and the cabinet will eventually house a built in fridge like a subzero because that’s more expected in this area. We just haven’t found a great deal on one yet and that kitchen aid fridge won’t die, LOL!
I included a before/after collage photo. People say “your kitchen before didn’t look bad,” but it was in horrible condition. The cabinetry was literally falling apart, and the layout was horrible to work in, we had no ventilation for the cooktop (and we do a lot of high heat cooking) and it was just miserable to work in because the layout was so difficult. My kitchen now is a dream to work in!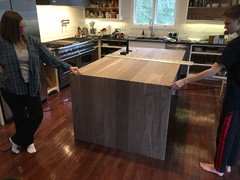
Sara
il y a 4 ansI am so impressed-those are beautiful kitchens and the work is meticulous. Nice job!!!salex a remercié Sarasalex
Auteur d'origineil y a 4 ansSkmom, you hubby did a great job! I remember seeing your walnut waterfall counter in other threads and it is perfect! I'm really impressed that you only went without a kitchen for two weeks too. When you say that the area around the fridge can be removed for a built-in fridge, does that mean you plan to remove the open shelf to allow for the taller part of a built-in? It looks great in the meantime too. Right now I'm planning the details of the fridge/pantry wall of my kitchen (not shown above) and am wondering about little details that will allow us to upgrade in the future (although we have a beam right over the fridge, so I might not have the same height that you do for an open shelf and then another top cabinet).

MountainView
il y a 4 ansJust amazing work by both salex and skmom's hubby! If I recall correctly, skmom's hubby is in fact a rocket scientist, and now we see that salex is working on (or finished?) his PhD. So apparently, it takes above average intelligence to create such incredible craftsmanship. Although I realize my conclusion is a logical fallacy... but I'm just sayin', my n=2 data at this point indicates there may be a correlation! :)
Shannon_WI
il y a 4 ansDernière modification :il y a 4 ansSalex - You are a master carpenter, a Phd, and a skier! Wow, your kitchen is gorgeous! I love it. Can you do my kitchen? :) (I have difficulty hanging a painting, so I am in awe.)
 salex a remercié Shannon_WI
salex
Auteur d'origineil y a 4 ansMountainView - *Her* PhD ;) (and still working on it). I think it takes more OCD (a nice way of saying patience and attention to detail) rather than intelligence - just like a PhD.
Shannon_WI - I often tell myself that if the science thing doesn't work out, at least I can make things out of wood!
skmom